Contents
When your garage door suddenly won’t open, it might be time to replace the springs. This vital task requires careful attention to safety and a clear understanding of the process. You’ll need the right tools and a step-by-step approach to ensure everything goes smoothly. Knowing the types of springs and how to handle them can make all the difference in your repair efforts. Let’s explore how to tackle this project effectively.
Key Takeaways
- Identify the type of garage door springs (torsion or extension) to ensure you purchase the correct replacement parts.
- Disconnect the power supply and wear protective gear, such as gloves and goggles, for safety during the replacement process.
- Carefully release tension from the old springs using the appropriate tools and safety protocols to avoid injuries.
- Install the new springs in alignment with the garage door system, securing them tightly and adjusting tension for balance.
- Test the door’s functionality by manually lifting it and observing its tracking, making adjustments as needed for smooth operation.
Understanding Garage Door Springs
Garage door springs are essential components that bear the weight of your door and enable smooth operation. Understanding their mechanics is important, especially since different garage door types utilize varying spring systems.
Generally, you’ll find two main types: torsion springs and extension springs. Torsion springs are mounted above the door and use torque to lift it, while extension springs are located on either side and stretch to facilitate movement.
When you engage your garage door opener, these springs work in harmony with the door’s weight, ensuring it opens and closes safely and efficiently. If the springs malfunction, you might face difficulties with your door’s operation, making it crucial to recognize the signs of wear.
Safety Precautions Before Starting
Before starting your garage door spring replacement, it’s essential to prioritize safety.
Make sure you wear protective gear, like gloves and goggles, to shield yourself from potential injuries.
Additionally, disconnect the power supply and secure your work area to prevent accidents while you work.
Wear Protective Gear
When tackling the task of replacing garage door springs, it’s vital to prioritize your safety by wearing the right protective gear.
Start by putting on durable protective gloves to shield your hands from sharp edges and potential pinch points. These gloves will help you grip tools securely while minimizing the risk of injury.
Next, don’t forget to wear safety goggles; they’re important for protecting your eyes from flying debris and dust during the replacement process.
By taking these simple precautions, you ensure your safety and create a more efficient working environment.
Remember, you’re part of a community that values safety, and following these steps helps you contribute to that shared goal.
Stay safe and confident as you work!
Disconnect Power Supply
One essential step in ensuring your safety during the garage door spring replacement process is disconnecting the power supply.
Start by identifying all power sources connected to your garage door opener. This typically includes unplugging the unit from the wall outlet and turning off the circuit breaker that supplies power to it.
By doing this, you greatly reduce the risk of accidental activation while you’re working. Always remember that electrical safety is paramount.
Double-check that the opener is completely powered down before proceeding. If you’re unsure which circuit controls the garage door, consult your home’s electrical panel or seek assistance from a knowledgeable friend.
Taking these precautions helps create a safe environment, allowing you to focus on the task at hand.
Secure Work Area
With the power supply disconnected, the next step is to secure your work area to ensure a safe environment.
Start by clearing any clutter around the garage door; this’ll help you move freely and prevent accidents. Use organizational tips like placing your tools in a designated spot and making sure everything’s within reach.
It’s wise to lay down a mat or cardboard to protect the floor and provide some cushioning. Remember to keep pets and children away; they can easily become distractions or get hurt.
Finally, make certain you have proper lighting to see clearly while you work. A well-organized and secure work area enhances safety and fosters a sense of belonging as you tackle this project confidently.
Tools and Materials Needed
Before you start replacing your garage door springs, you’ll need to gather some essential tools and materials.
Make sure you have the right safety equipment to protect yourself during the process.
Additionally, understanding the specific materials required for your garage door springs is vital for a successful replacement.
Essential Tools Overview
While replacing garage door springs might seem intimidating, having the right tools on hand simplifies the process considerably.
First, you’ll need a sturdy pair of pliers, which help with manipulating the spring types and adjusting the hardware. A winding bar is essential for managing spring tension safely and effectively.
Don’t forget a socket wrench set; it’s crucial for loosening and tightening bolts. Additionally, a tape measure will assist in ensuring accurate measurements for the new springs.
A step ladder can provide the height you need to reach the springs comfortably. Finally, a sturdy workbench or a flat surface will help you organize your tools and materials, making the replacement process smoother and more efficient.
Required Safety Equipment
Replacing garage door springs involves more than just having the right tools; it’s vital to prioritize your safety throughout the process.
Before you get started, make sure you have the proper safety equipment to protect yourself from potential hazards.
Here’s what you should have on hand:
Safety goggles: These will shield your eyes from flying debris and any accidental releases of tension.
Work gloves: Wearing gloves will give you a better grip and protect your hands from sharp edges and pinch points.
Steel-toed boots: These provide critical foot protection in case something heavy falls.
Material Specifications Needed
To successfully replace garage door springs, you’ll need a specific set of tools and materials that ensure the job runs smoothly and safely. Understanding spring materials and spring specifications is vital for your project’s success. Here’s a quick overview of what you’ll need:
| Tool/Material | Purpose |
|---|---|
| Torsion Springs | Provide the necessary tension |
| Safety Cables | Prevent accidents during replacement |
| Wrenches | Adjust spring tension |
| Pliers | Secure and manipulate components |
Using the right materials ensures your garage door functions properly, and it fosters a sense of accomplishment. You’re part of a community that values safety and craftsmanship, making your home a better place.
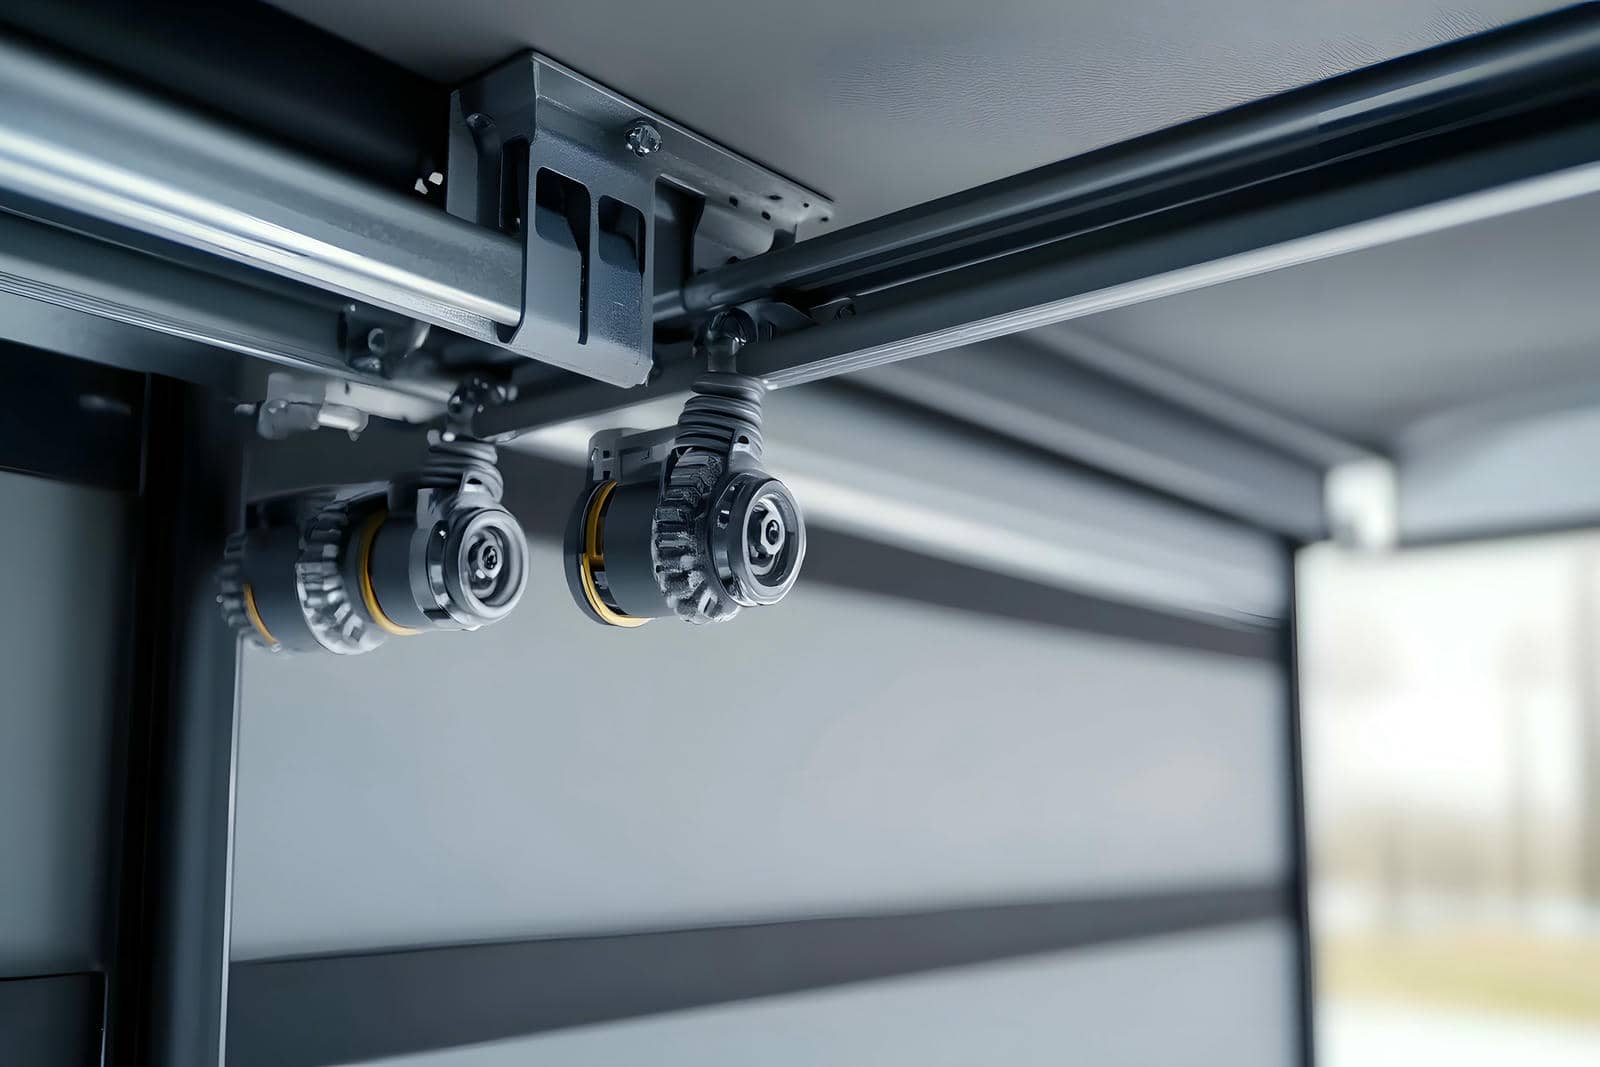
Identifying the Type of Springs
How can you tell which type of garage door springs you have? Identifying whether you have torsion springs or extension springs is essential before starting your replacement.
Torsion springs are typically mounted above the door and work by twisting, while extension springs are located on either side of the door and stretch to lift the door.
Here are some tips to help you identify your springs:
- Look at the location: Torsion springs are centered above the door; extension springs are on the sides.
- Examine the mechanism: Torsion springs twist, while extension springs expand and contract.
- Check for safety: Torsion springs usually have safety cables; extension springs might not.
Knowing the type of springs you have ensures you purchase the right replacement parts and helps you feel more confident about the entire process.
Removing the Old Springs
Before diving into the removal process, make sure you have the right tools at hand, as safety is paramount when handling garage door springs. Having a proper understanding of spring tension is essential because these springs can be dangerous if not handled correctly.
Here’s a quick checklist of tools you’ll need:
| Tool | Purpose |
|---|---|
| Wrench | To loosen and remove bolts |
| Safety glasses | To protect your eyes |
| Ladder | To reach high areas |
| Work gloves | For hand protection |
| Spring winding bars | To safely unwind the springs |
Once you’ve gathered your tools, begin by releasing the spring tension carefully. Remember, improper spring maintenance can lead to injuries. Always follow safety protocols to ensure a smooth removal process. Keep your workspace organized and focused—you’re on the right track!
Installing New Springs
Now that you’ve safely removed the old springs, it’s time to install the new ones.
Begin by carefully positioning the new springs in the same location as the old ones, ensuring they align correctly with your garage door system. Pay close attention to the spring tension; it’s essential for the door’s functionality.
Next, follow these installation techniques for a smooth process:
- Secure the springs: Use appropriate hardware to fasten the springs tightly, ensuring they’re stable.
- Adjust spring tension: Gradually adjust the tension until it’s balanced, which helps the door operate smoothly.
- Check alignment: Make sure the springs are properly aligned to avoid future issues.
Testing and Final Adjustments
Once you’ve installed the new springs, testing their functionality is essential to confirm your garage door operates safely and efficiently. Begin by checking the spring tension; it should feel balanced when you manually lift the door halfway. If it feels heavy or light, adjust the tension accordingly. Next, confirm proper door alignment by observing whether the door tracks smoothly when opening and closing.
Use the table below to help guide your adjustments:
| Adjustment Type | Ideal Condition | Action Required |
|---|---|---|
| Spring Tension | Balanced lift | Adjust tension as needed |
| Door Alignment | Smooth tracking | Realign tracks or rollers |
| Overall Function | Quiet operation | Lubricate moving parts |
Summary
In the end, replacing garage door springs might seem like an intimidating task, but with your newfound skills, you’ll wonder why you ever considered calling a professional. After all, who needs the added expense when you can tackle it yourself? Just remember to keep an eye on those springs; they’re like the unsung heroes of your garage. With a little maintenance, they’ll keep your door rolling smoothly, proving that sometimes the simplest tasks can yield the greatest rewards.
Recent Posts
Top Budget-Friendly Garage Door Options Available
When it comes to enhancing your home’s curb appeal, choosing the right garage door can
5 Tips for Inexpensive Custom Garage Door Installation
Installing a custom garage door can feel like steering through a maze—you want the perfect
Why Choose Affordable Garage Door Options?
Choosing an expensive garage door might seem like a smart investment, but opting for affordable